
AI and automation are two trending topics these days and same things are going on with software development processes. To deliver quick and quality software, CICD pipelines workflows and integration of multiple service providers is necessary. So, lets learn today how to create declarative CICD Jenkins Pipeline for Web Application using the Ubuntu AMI on AWS and concepts of Docker, DockerHub, GitHub that includes build, test and deployment lifecycle.
First let’s understand the prerequisites and these key terms:
Amazon Web Services: The most popular and robust cloud infrastructure, AWS ensures secure, reliable and scalable cloud services for our CICD pipeline where we can manage our infrastructure resources.
Jenkins: It is also known as the automation hub where we will create stages of building, testing and deploying the code. With multiple plugins available it offers flexibility to integrate with various tools and services and best choice for creating CICD pipelines.
Docker: Docker helps in containerizing the applications and ensures consistency across different environments. Containers comprises the application along with its dependencies that makes us easy to deploy and run the same application on any system.
Now without further a due, lets get started with following steps:
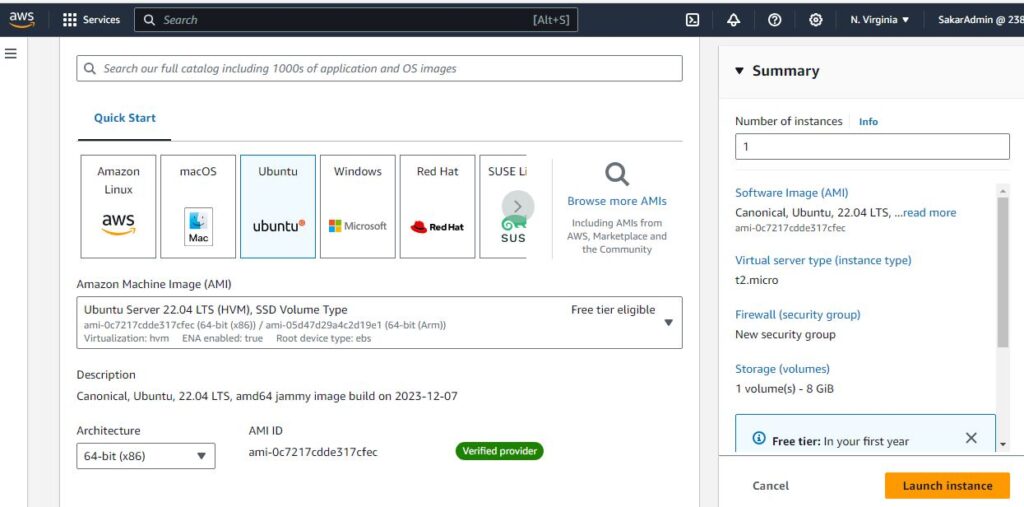
Step 1: Login to AWS Management Console, Launch Ubuntu Instance and Connect to instance
Step 2: Update the system
sudo apt-get update
Step 3: Clone the webapp files from git
git clone https://github.com/SakeshKaranjit/django-notes-app.git
Step 4: Install Docker
sudo apt install docker.io
Step 5: Check docker version
docker --version
Step 5: Give current user the super user access by adding to docker group
sudo usermod -aG docker $USER
Step 6: Reboot to see changes
sudo reboot
Step 7: Check that now we don’t need to type sudo everytime we run docker command
docker ps
Step 8: Go to app directory and view files
cd django-notes-app
ls
Step 9: View the required dependencies on requirements.txt and Dockerfile sequentially
cat Dockerfile
cat requirements.txt
Step 10: Build an image named notes-app
docker build -t notes-app .
Step 11: Update all the packages
sudo apt update
Step 12: We need to install java before installing Jenkins, so lets install java and check if its installed succesfully
sudo apt install openjdk-17-jre
java --version
Step 13: Get the Jenkins Key File
sudo wget -O /usr/share/keyrings/jenkins-keyring.asc \
https://pkg.jenkins.io/debian-stable/jenkins.io-2023.key
Step 14: Add Jenkins apt repository entry
echo deb [signed-by=/usr/share/keyrings/jenkins-keyring.asc] \
https://pkg.jenkins.io/debian-stable binary/ | sudo tee \
/etc/apt/sources.list.d/jenkins.list > /dev/null
Step 15: Update the system packages
sudo apt-get update
Step 16: Install Jenkins and verify its running
Sudo apt install Jenkins
Service Jenkins status
Step 17: Now on your browser copy and paste the public ip of your instance followed by : 8080 port
12.345.6.78:8080
Step 18: Follow the instruction mentioned there to see the password then copy and enter to continue
sudo cat /var/lib/jenkins/secrets/initialAdminPassword
Step 19: For now choose install suggested plugins and continue with installation then create first admin username
Step 20: Our Jenkins installation is now complete and we must be at our Jenkins dashboard. We will start building our first software project by creating the job, give and “item name”, click on “Pipeline” and then “OK”
Step 21: We are now at Pipeline configuration page, write a short description, checkmark on Github project, give the project url:
https://github.com/SakeshKaranjit/django-notes-app
Also give a display name.
Step 22: Next check mark on “GitHub hook trigger for GITScm polling” so that later we get source code Jenkins file from github and webhook config to trigger the “build now” process.
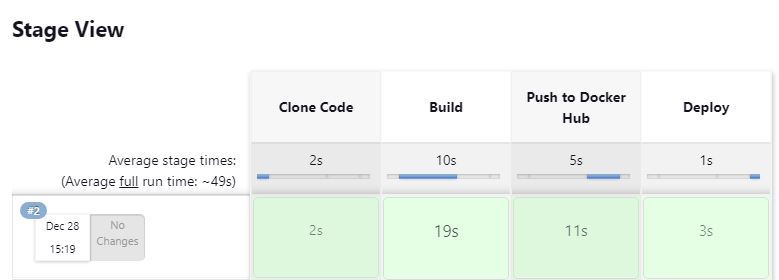
Step 23: Select the Pipeline script and write the following code in Groovy format and save for now.
pipeline {
    agent any
    stages{
        stage("Clone Code"){
            steps {
                echo "Cloning the code"
                git url:"https://github.com/SakeshKaranjit/django-notes-app.git", branch: "main"
            }
        }
        stage("Build"){
            steps {
                echo "Building the image"
                sh "docker build -t my-note-app ."
            }
        }
        stage("Push to Docker Hub"){
            steps {
                echo "Pushing the image to docker hub"
               withCredentials([usernamePassword(credentialsId:"dockerHub",passwordVariable:"dockerHubPass",usernameVariable:"dockerHubUser")]){

                sh "docker tag my-note-app ${env.dockerHubUser}/my-note-app:latest"
                sh "docker login -u ${env.dockerHubUser} -p ${env.dockerHubPass}"
                sh "docker push ${env.dockerHubUser}/my-note-app:latest"
                }
            }
        }
        stage("Deploy"){
            steps {
                echo "Deploying the container"
                sh "docker-compose down && docker-compose up -d"
            }
        }
    }
}
Step 24: Before deploying the above pipeline, we need to create a Credential ID to login into DockerHub and push the image there. So, go to dashboard > Manage Jenkins > Credentials. Click on global then +Add Credentials
Type your DockerHub Username and Password
Give ID Name: dockerHub and its Description below.
Click on create
Step 25: Go back to instance then add Jenkins to docker group to give permissions and also open port 8000 in security group.
sudo usermod -aG docker Jenkins
and reboot
sudo reboot
Step 26: Install docker compose
Sudo apt install docker-compose
Step 27: Now click on build now to see all the pipeline process into action and it will be a success
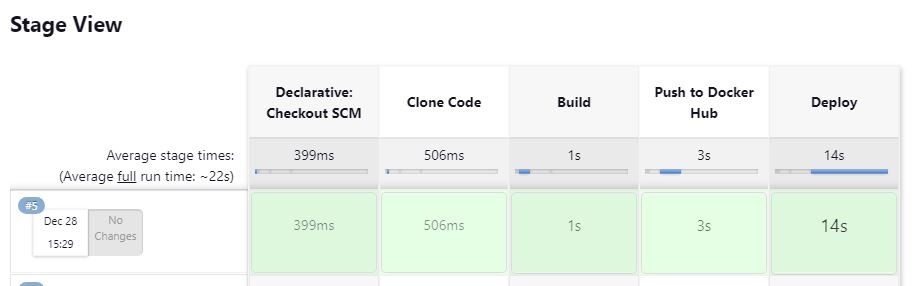
Now, lets do some automation. Like whenever a developer commits a code on github, it should automatically trigger this pipeline process. For that, we need to tweak some settings.
To do: Go to Configure, and under pipeline settings, select Pipeline script from SCM(source code).
Select Git as SCM, and Repository URL: https://github.com/SakeshKaranjit/django-notes-app
Change Branch to: */main
Verify the ScriptPath is “Jenkinsfile”
Click on Save and Apply
Now Click on Build Now to see if it Declarative: Checkout SCM worked or not. Congratulations if it worked!!
Step 28: Now lets see the concept of WebHook. Go to github app repo url and click on settings. On the left column click on WebHooks.
You might have to login github for verification. Add/Edit webhook. Then configure the payload URL:
http:// 12.345.6.78:8080/github-webhook/
Ensure Send me everything is checked and update webhook. Click on webhook. Refresh the page. Now if you see the green tick before the webhook event link, then Congratulations!! Your webhook configuration is successful.
In this way automating the CICD pipeline with Jenkins, AWS and Docker transforms the software development process that enhances efficiency, reliability and scalability. With less repetitive manual tasks and automated approach, we can bring our web application development workflow to next level.
Leave a Reply